Monday, September 30, 2013

Taylored Challenged

I have to get this posted really, really quickly!

Taylored Expressions has a challenge that ends at 11:59 PST. It's now 11:53! I like last minute. 

I just went to link it, and it is closed. I guess my laptop doesn't know the time. 


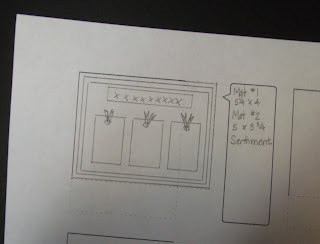
This is the inspiration:


And here is my card:

As I can't link, I'll add the details.

I used my Deluxe September kit from Taylored Expressions: the stamp is TE's Sending Smiles; paper, We R Memory Keepers Chalkboard and Bazzill (?) Arizona and Aqua; and the ribbon.

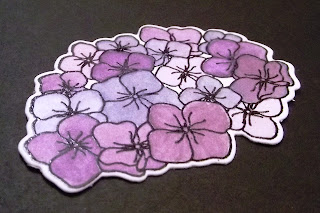
The flowers and butterflies were stamped with Memento Tuxedo Black and colored with my Copics; two layers of flowers were fussy cut. The butterflies also have Spica glitter pen on the outside edge. The butterflies are from TE's Summer Wreath set. I used TE's Curly Border die and My Favorite Things Fishtail Flags Layers Stax. 

As I am totally crazy, the curly border is inlaid. Yes, I painstakingly put the tiny pieces inside the loops. 

Friday, September 27, 2013

Oh, my!

Where have I been? I haven't been here since May? I guess summer got in the way.

I signed up for the Online Card Class Insider. Even though it is a short class, I'm still behind. Here is my card for the first day. 
Paper: Essentials by Ellen; Hero Hues Grenadine
Stamp: Penny Black
Ink: Archival Ink Jet Black
Distress Markers: Barn Door, Faded Jeans, Fired Brick, Mustard Seed, Spiced Marmalade, Tumbled Glass, Wild Honey, Walnut Stain and Weathered Wood
Distress Ink: Gathered Twigs and Mowed Lawn (I pressed it on my Craft Sheet and picked up the ink with my paint brush.) Tumbled Glass
Stickles: Yellow
Other: Blending Tool, Craft Sheet, Tombow Mono Multi Glue, ATG Gun and Glue, Computer

And the inside...
The Stickles are hard to see, but they are on the candle flames on both the outside and inside. 

Lesson learned? I can't put the ink on the paper and paint with water. I have to lay the ink on my craft sheet and pick it up with the paint brush.  

On to Days 2 and 3...


Sunday, May 5, 2013

Online Card Class Day 1 Masculine Card

As I can only link one card per post to the Gallery at the Online Card Class His & Hers, here's the male.


Paper:  Hero Hues Mocha Layering Paper; Speckletone Kraft
Stamps:  Cornish Heritage Farms, SL-1280WUM Open Plaid Background and SL-3138WUM Petite Pattern Background; Hero Arts CL140 Thinking of You
Ink:  Hero Arts Shadow Ink Cup O’ Joe; Distress Embossing Ink, Distress Ink Peeled Paint
Embossing Powder:  Distress Powder Peeled Paint, Tea Dye and Vintage Photo; Zing White
Dies:  Spellbinders S4-116 Standard Circles Small; My Favorite Things Fishtail Flags Layers Stax; Lawn Cuts A Birdie Told Me
Other: Ranger Enamel Accents White; EK Success Powder Tool

Online Card Class

Good grief! It has been over a month since I've posted! Unfortunately, I do have an excuse. I decided to 'ride' my horse for the first time several weeks ago. (I've had her since November, but she had been starved and needed to gain weight. She is now where she should be.) 

As I was out with her, I decided to get on...without a saddle or bridle. I was almost all the way on when she decided it was time to get moving. I took the time to decide do I try to pull myself all the way on or dive and roll. I chose the dive and roll a few seconds too late as I thought I could pull myself on. I'm still taking painkillers and muscle relaxants. 

On to the Online Card Class His & Hers. I did get a couple of cards made for Day 1 and work on my His & Hers list. 
Paper:  Speckletone Kraft; Strathmore Watercolor; Neenah Vellum
Stamps:  Hero Arts CG287 Flower Corsage and CL140 Thinking of You
Ink:  StazOn Jet Black; VersaMark Ink
Distress Markers: Dried Marigold, Worn Lipstick, Barn Door, Scattered Straw, Mustard Seed, Fired Brick, Shabby Shutters, Peeled Paint and Broken China 
Other:  Pentel Aquash Brush; Zing White Embossing Powder 

And the beginnings of my list:


Sunday, March 24, 2013

Online Card Class - Pattern Play Day 4

Altering Pattern Paper

Shari's demonstration at the Online Card Class - Pattern Play had me thinking masculine card. I have the Echo Park Note to Self 6 x 6 pad. I'm not too sure why I bought it as it is a lot of dark colors. All I can think is I like the paper with the View Master reels, which I didn't use on this card. Go figure.


The altered paper is the background. Following Shari's instructions, those creases are sanded. I need more practice, a few of those were sanded through!

Supplies:  
   Paper:  Echo Park Note to Self
   Stamps:  Hero Arts CL340 Birthday Sayings
   Ink:  Hero Hues Black
   Punches:  Marvy 5/8" and 3/4" circles 


Online Card Class - Pattern Play Day 3

I'm pushing the midnight deadline! What else is new?

Kristina started the day at the Online Card Class Pattern Play. Her video for Hard to Use & Bold Patterns challenged me as I avoid the bold, they most definitely are hard to use. 


Supplies:
   Paper:  Crate Paper Maggie Holmes; Hero Hues Celadon;
     Yellow from my stash
   Stamps:  My Favorite Things Inspired by Butterflies and Flower 
     Silhouette; Making Memories Banners and Alpha Dilly Dally
   Ink:  Hero Hues Wet Cement


Saturday, February 9, 2013

Online Card Class Day 2

I had a very hard time with the one layer homework. I want pop dots. I want frames. I want patterned paper. That's not the assignment.

This is what I finally came up with. 

Lesson learned: Don't trust the top edge of the 4.25 x 5.5 mask is square with the die cut! Next time I will put the inner most square down first and then work out with the other masks. 

Supplies:
Taylored Expressions Snow White Choice Cardstock
Judikins Eclipse Art Masking Tape Sheets
Stamps: MFT Flower Silhouette, MFT PI-All Occasion Sentiments; Making Memories Banners & Alpha Dilly Dally
Ink: Memento Tuxedo Black, Angel Pink, Bamboo Leaves, Cantaloupe, Lulu Lavender; Distress Ink Faded Jeans; VersaMark
Pens: Distress Marker Peeled Paint, Milled Lavender, Mustard Seed, Spiced Marmalade, Wild Honey, Worn Lipstick; Spica Buttermilk, Lilac, Pink
Dies: MFT Flower Silhouette, Sentiment Strips; Spellbinders Classic Square Small
Ranger Super Fine Detail Black Embossing Powder


Online Card Class

I'm a few nine days behind in the Clean and Simple Card Making 2 class! 

Last night (Wednesday) I finished a card for Day 1. I wanted to use Kristina's sketch but did't have a mask, so I made one. I own the Taylored Expressions Quatrefoil Cutting Plate which is perfect for what I had in mind.


Do I have any Mister Hueys? No. Out came the Shabby Shutters Distress Re-Inker. I'm off to a great start! LOL

As I used Copics to color my image, I used Simon Says Stamp's 120 lb card stock. This was the first time I've used it, and the ink didn't bleed through! I know others have said it doesn't but as I don't know how heavy a hand they have with coloring, I had to see it for myself. I tend to put down lots of layers of color, probably more then really needed.

One thing I learned about the card stock, score it really, really well. I thought I had but the card stock cracked when I folded it. So much for being 'neat and professional.' Hey, it's a class, the whole point is to learn. Right?
Added Saturday: I'm just now getting pictures taken. I don't know what is wrong with the color. I've taken a bazillion, (okay, maybe not) and I can't get it right. Sorry, I wish it was better.

Supplies:
Simon Says Stamp 120 lb card stock
Taylored Expressions Quatrefoil Cutting Plate
Judikins Eclipse Art Masking Tape
Distress Re-Inker Shabby Shutters
Spellbinders S4-110 Classic Oval
Lockhart Stamp Co. Hydrangea
Memento Tuxedo Black
Copics: B23, B24, B26, B63, B91, B93, BV11, BV13, BV17 E50, E53, G82, G99
MFT Fishtail Flags Layers Stax
VersaMark Ink
American Crafts Zing White Embossing Powder
MFT PI-All Occasions Sentiments
Distress Ink Faded Jeans
Distress Marker Faded Jeans
All Night Media 1/16" Mini Pop Dots

Now to Day 2...


Saturday, January 19, 2013

I don't like it

But I turned the word verification back on. I don't like spam and was getting too much. If there were a better way, I'd do it! Any suggestions?

Brought Pascha home today. The llamas ran to the fence to check her out but would run away if Pascha got too close. Annie checked her out and did not run away. Good horse!

I'd post a picture but it was almost dark when we got home and by the time we had her settled, it was dark. Not good photo shooting light. :)

Thursday, January 17, 2013

Oh my!

I knew it had been some time since I had posted. I didn't realize it had been THAT long!

I added more to my schedule this past fall. I'm now teaching the 2 year old children at our church and doing our church bulletin. 

Then I did something I had no plan of doing, I bought a horse, Annie. The people I bought Annie from rescued her from an auction. She was in pretty bad shape when they got her but had her on the road to recovery. 

As I had no plans to buy a horse, I had some quick fencing and shelter work to do. DH had bought a Powder Mountain shelter several years ago. The plan had always been using it for parking the car. (When the house you live in was built over 100 years ago, garages were not important.) However, that never happened. 

As a friend has llamas living here, I couldn't put Annie out in the pasture with them until they became familiar with each other. That meant quick putting in some fence posts and adding some cattle panels. Annie lived there for a couple of weeks.
As you can see, she needed to put more weight on. I bought a horse blanket as she had no fat to keep her warm this winter.  
The day after we brought Annie home, Daphne was here and I asked if she wanted to go see the llamas. As we were walking out there, all of a sudden Daph says, "Gramma, you have a horse!" She was so excited. I loved the look on her face.
Daphne loves Annie. I didn't know how Annie would be around small children so was very careful. However, Annie proved to be wonderful. 

Whenever Daph is here, she wants to take Annie on a walk. Daph isn't brave enough to get on Annie, but one day. I haven't ridden Annie either. I want her to be up to weight first. Our vet checked her last month and says she could use another 30 pounds.

Once Annie grazed down the temporary location, and the llamas knew she was okay, we moved her into the pasture. Yes, we moved the shelter, too. And I've been putting up more fence. I should be out putting up more as I write.

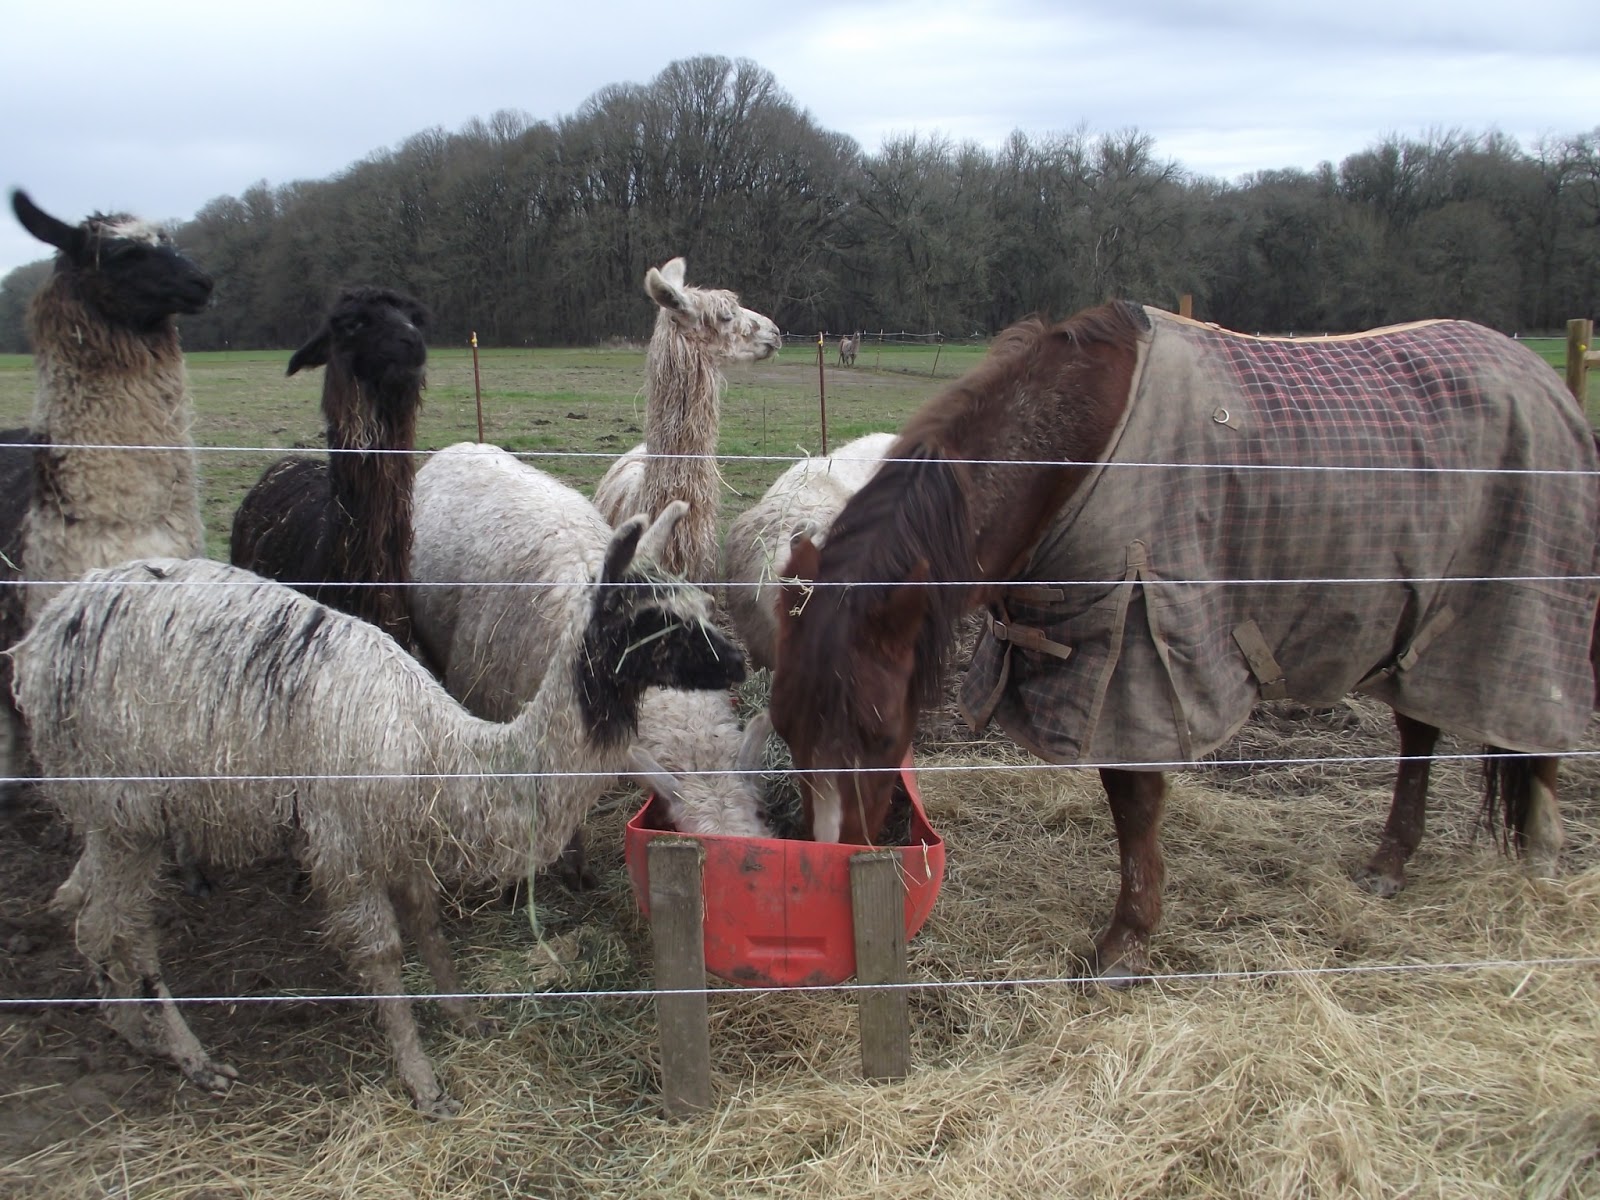
As Annie had been starved, she was very possessive regarding feed. The llamas like to share, not Annie. They learned when her ears went back,  'Move, Quickly!'
Annie is now more willing to share but as you can see, the little guy in front is ready to jump back, just in case! The manger is one of the llamas feeding areas, however, Annie has laid claim to it. When their owner comes to feed them, this one gets an 'Annie portion' to keep her busy while he puts feed in the other two. She is trusting enough in getting fed that if she starts towards the other two we tell her to go back to hers and leave the others alone. She does a good job of listening, while we are watching.  

To add more spice to life, DH has been researching dual purpose beef, ones that can be milked and have good beef qualities. He found this sweetheart online.
She is a registered Milking Shorthorn and comes home Saturday. As she is only nine months old, she won't get bred until she is at least 18 months. Then a nine month pregnancy, so we have a year and a half before I have to start milking. :) 

I really am hoping to get back to my craft cave! I started Christmas cards in November but they will be for next year. 

I MUST get out to the fence project. Thanks for stopping by.

Thursday, September 27, 2012

Play Time

Last week I played with my Perfect Pearls, a push from the Online Card Class Kick Start. I painted with the Perfect Pearls and water on black paper. It was okay but rather shiny.

Perfect Pearls on black paper

This week, after much, much practice, I found a combination I like. Actually two.

For the first one I used water color paint (which is another product I bought over a year ago and hadn't used) with the Perfect Pearls. The shine from the pearls is subtle. Also, there is a the ability to mix colors. 
Water color paint and Perfect Pearls

For the second, I painted with my Distress Re-Inkers and water. I put one drop of the re-inker on my Non-Stick Craft Sheet, several separate drops of water and a small amount of the Perfect Pearls. As I was able to control the amount of ink, water and pearls, I had color variation.
Re-Inker, Perfect Pearls and water

The three, top left Perfect Pearls, top right Water Colors
and bottom Re-Inkers
I doubt I'll do the straight Perfect Pearls again. But never say never! The other two I go back and forth as to which is my favorite. It's like my children, I can't pick a favorite! :)

I used the Re-Inker method for this card and entered it in the Taylored Expressions Wild Card Spot for Last Card Standing competition, here.

Paper: Echo Park 'Springtime', Choice Cardstock Snow White, Neenah Brilliant White Text and Strathmore Watercolor Paper
Stamps: Taylored Expressions 'Forever in Bloom', Sentiment printed from a word document
Inks: VersaMark; Distress Ink - Crushed Olive & Gathered Twigs; Re-Inkers - dusty Concord, Milled Lavender & Crushed Olive
Embossing Powder: Ranger Super Fine Detail Black
Perfect Pearls: Forever Violet, Interference Violet & Forever Green
Dies: Taylored Dies 'Hydrangea Blooms'; Spellbinders S4-110,
S4-111, S4-114, S4-128 & S4-129
Ribbon: United Ribbons Seam Binding, dyed with Dusty Concord and Forever Violet in a Mini Mister
Thread: Madeira Supertwist & Madeira Opal
Pearls: Basic Grey Opaline
Other: Sewing Machine, Cuttlebug, Glue Dots, All Night Media Pop Dots

This is probably more then you wanted to know but I'm in a writing mood! Thanks for stopping by.


Friday, September 21, 2012

Something Old and Something New

The Online Card Class, Kick Start, is getting me to use product I've had for years. And allowing me to play! :)

I bought a bunch of Perfect Pearls, I don't know how long ago, years! They stayed in their packages, for months probably years, until I decided to mix them with my Distress Reinkers in Mini Misters. Perhaps I should try using them as the package suggested.

I stamped some hydrangeas (the new) with the Perfect Medium and dusted a few of the Perfect Pearls over them. I didn't like it, it looked muddy. Was it the white paper I had used?

I decided to try painting with them. Didn't like the look of that either. Okay, I'll try black paper and see what that looks like. That worked for me. However, I know I need to play with them more so I really like the look of them not just 'it works.'
Cardstock: Choice Cardstock Buttercream; Black scrap from my stash. (I need to put together bundles!)
Design Paper: Teresa Collins 'Sweet Afternoon'
Stamps: Hero Arts CL140 'Thinking of You', 657773 Antiques Flowers & Butterflies; Taylored Expressions 'Forever in Bloom'
Inks: Distress Ink 'Brushed Corduroy'; Ranger Perfect Medium; Tsukinedo VersaMark
Embossing Powder: Stampendous Ultra Detail White; Ranger Super Fine Detail Black
Perfect Pearls: Blue Patina, Interference Violet, Forever Green, Sunflower Sparkle
Dies: Spellbinders S4-114 & S4-115; 657773 Antiques Flowers & Butterflies; Taylored Dies Hydrangea Blooms
Other: EK Success Powder Tool; Sewing Machine; All Night Media Mini Pop Dots; Queen & Co Pearls

I've keep my Perfect Pearls in this Tupperware Container. The Reinkers are in a matching one so I can quickly spot the two of them for making my mists.

Now on to the farming, a momma pig is having babies... And, of course, DH is gone on business. Never fails.

When I checked her earlier her, she had five babies. This time she has 10. Here is a picture of six. The other four were under the heat lamp.


Wednesday, September 19, 2012

Organized?

My dream! I tell DH he has four greenhouses (about 5,500 sq ft), I need at least half that space for my crafting. And I want it added to the house, with a floor and real roof (the greenhouses have roofs but I would prefer something other then plastic over my crafts). Well, I probably don't need that much space but he has always said figure out what you need and double it!

If I was willing to give up some hobbies, I could get by with even less. However, my sewing machines aren't leaving nor all the fabric I have. Then there are the patterns I like to buy. Add to that my passion for cross stitch. No way am I giving up that linen, silk thread or charts. Toss in the paper crafting, you know how much space that takes, and my 12 x 13 room just isn't enough. Then when our granddaughter spends the night, this is the room she stays in.

Upon further review, yep, I need about half the greenhouse space.

Last week I decided to go through some of the boxes in my room. Yes, I found things I had forgotten I had bought. I'm thankful I didn't buy them a second time! And guess which box they went into! Yes, To Use. I didn't know that was it's name until today in the Kick Start class.

As I look around my room, this is the only thing I am willing to put out there for the world to see...

My Copics. And even this is iffy, after I took the picture I realized some of the pens are in upside down. They are now fixed (I like them brush tip down). DH drinks Crystal Light and I found the empty containers to be perfect for holding my pens. It helps that it was a cheap storage system! 

So, now to the HUGE task of Day 3's homework. The rest of the room is just too messy for anyone to see. Does anyone else make a bigger mess of things when cleaning then the mess they started with?

Before I hit 'Publish' I was looking around to see if there was anything else I would photograph and add. Then I had to laugh, right there with my stamp cleaners is a cross stitch chart. What can I say?

At least it is a small one.

Thinking of You

I received my Taylored Expressions Key Ingredients kit yesterday (actually, Monday). Today (really Tuesday) I took it out to play. I can't believe I waited a whole day! (I got a card made and wrote the post, but the camera didn't want to work for me. So, now the real today, Wednesday, I got some taken.)

Again, I used tips from the Online Card Class, Kick Start. And I used a stamp from Taylored Expressions so I could enter their challenge.


The Sketch and Inspiration Paper
The not even close to the sketch card!
 
I guess organizing my thoughts means nothing to me! What can I say? At least I used the paper?

The paper and ribbon are from the Key Ingredients kit. I love having everything put together for me. And I enjoy looking through Taylor's Coordinating Products section.

Cardstock: Choice Cardstock Snow White, Red Rock
Design Paper: My Mind's Eye The Sweetest Thing 'Tangerine'
Ribbon: Satin ribbon from the kit
Stamps: Taylored Expressions 'Summer Wreath', Hero Arts CL140 Thinking of You
Copics: G21, G24, G82, R20, R22, R24, R27, Y21, Y26, YR24
Spica: Buttermilk (it's in the flower centers)
Ink: Memento Tuxedo Black, VersaMark
Embossing Powder: Ranger's Super Fine Detail Black
Dies: Taylored Expressions 'Seasonal Wreath', Lifestyle Crafts 'Nesting Lace Squares'
Other: Sewing Machine, 3D-Dots

Yes, I am slightly crazy. I stamped the wreath twice so I could cut some of the flowers out and pop them up. I've yet to see a flat wreath and I couldn't have one on the front of my card. The wreath is also popped off the Lace Square. What fun is flat?

Now to work on Day 3 of the Kick Start class. Thank you for stopping by.


Last Card Standing

Do you like Project Runway or Chopped? Without leaving home, you can show your stuff in a similar type of competition at Taylored Expressions.

As I was trying to figure out what to do, I watched the first day of the Online Card Class, Kick Start. Yes, Organizing Ideas, what a great way to start a card. And yes, I do need organizing!

So I came up with a sketch. Did I follow it? No, but it's close. That's okay, isn't it? After I finished the card, I read this post from A Blog Named Hero. I tell you, it couldn't have worked out any better for me.  

The Sketch


The Card


I made a baby card because I fell in love with the background paper. I don't know why, but it just called to me. I guess phrases like 'New Baby Smell', 'Tiny Fingers', 'Tiny Toes', 'Pride and Joy' to name a few.

Stamps: Taylored Expressions "Welcome Little One"
Ink: Memento Tuxedo Black
Copics: B21, B23, G21, G82, R30, R32, Blender
Spica: Clear, yes it is there but the photo doesn't show it
Cardstock: Choice Cardstock Snow White, Bazzil Basics Hillary, Flamingo and Lagoon
Design Paper: Fancy Pants Designs "Baby Mine"
Dies: Taylored Dies "Curly Border", Sizzix "Tags, Scallop Combo #2", Spellbinders S4-247
Twine: My Mind's Eye Follow Your Heart "Be Happy"

I don't know how many photos I took of this card but I can't get a good one. I guess I need to find a Photography for Dummies class. Or maybe I need to learn how to edit. Either way, I need help.

Thank you for stopping by. If you have any photography tips, please leave them! Obviously I need all the help I can get.

Sunday, September 16, 2012

Last Day

Today is the last day for the CDAC Progressive Challenge. Tiffany Doodles provided an image with three surf boards. I don't surf. I don't have a clue about surfing. I would rather hang in a hammock.

The image had three surf boards so I lined them up in the back, twice. Then I took one, enlarged it and put it in the foreground.

The card base is Hero Hues Powder and the sand Kraft cardstock. The monkey image is from Doodle Dragon Studios and colored with Copics.  Yes, I wrote down which colors I used but I can't find the list. Too much going on here!

The surf boards and palm leaves were cut from Echo Park's Everyday Eclectic paper. I used dimensional adhesive on the palm leaves, under the foot and hand of the monkey and the blue board.  

Finally, the sentiment is from Create with TLC, cut out with Spellbinders S4-143 and colored with Distress Ink, Squeezed Lemonade. Oh, I used my white Signo pen around the edge. That's all I could allow for clouds.  :)

I'm counting the minutes until the Online Card Class Kick Start begins. I need a good swift kick to get started! My brain is going in slow mo and I know Jennifer and Kristina will get me started again.


Thursday, September 13, 2012

Lost

I have been AWOL and decided to quick check in.

DD#3 has taken us for a ride. In June it was discovered she had high calcium levels. That led to a parathyroid hormone test which was way over normal. Then she had a scan done on her neck. Yes, one parathyroid glowed quite nicely. We met with an endocrinologist and then an ENT. She had two parathyroids removed last week.

As she has a lovely incision just above her collar bone, she isn't driving and I get to take her everywhere. She is trying not to turn her head too much as she doesn't want a big scar.

Yesterday DD#3 had follow up appointments with both doctors. At least they are in the same building. However the building is 75 miles away. The surgery was also done 75 miles away. We are blessed DD#1 lives close to the hospital so we don't have a motel bill.

Tuesday evening I caught DH pressing on his cheek. He had a toothache. Last night he couldn't sleep and admitted he should go to the dentist. Got in there, had an exam and we were sent to an oral surgeon. They took the tooth out. DH is now happy due to pain pills.

I feel like a medical transport driver. I want to lock myself in my room. Tomorrow I take DH back to the oral surgeon. Maybe next week I will get stay in my craft cave and no one will need to go to a doctor.


Monday, August 13, 2012

Where am I?

Between harvest, fair (DH is a 4-H leader), having granddaughter #1 for a week and taking DD#3 to doctor appointments, I haven't had time to play during normal business hours. Then when I stay up until 3 watching the Olympics the brain doesn't function as well as it should. But then, does it ever? Add to all of that, I decided I needed to clean out cupboards.

Tell me, why do I still have the wooden salad bowl set we received for a wedding gift 31 years ago? Wet wood is my 'fingernails on the chalkboard' item so we have never used it. Nor the wooden salt and pepper shakers. Have I honored the gift giver by keeping these items this long? Can I finally get rid of them? I voted 'Yes!'

While trying to stay awake watching the Olympics, I finally pulled out my July Key Ingredients kit from Taylored Expressions. I had a plan for ONE card, but as I worked on it, it kept changing because I kept finding different sketches to try. So, through all the changes it took more than one (translation, many) night to finish. Well, as I still have more pieces due to the changes, I don't think I've officially finished! What else is new?

I love the papers in the kit. I think (know) I need more of the Cosmo Cricket Tea for Two paper!


My Favorite Things sketch called out saying I had to use it. Here's the sketch


and what I came up with.
Yes, I changed a few things. The banner became a butterfly, cut from the same paper as the bottom band. I used Glossy Accents and Enamel Accents on it for some shine. Three circles morphed into nine Hero Arts pearls and a rectangle became an oval with mat. At least the base remained the same, sort of! It has four sections. Okay, so I started with the sketch but headed off in my own direction.

The other supplies:
     Image: My Favorite Things Bunch of Blooms
     Copics: E00, E21, E35, E37, E50, E59, G82, G99, R11, R20,
          R22, R24, R27, W3, W5, W7, Y26, Y28, Spica Buttermilk
     Paper: Bazzill Basics Lagoon, Choice Buttercream
     Dies: Butterfly: Hero Arts & Sizzix Antique Flowers &
          Butterflies, Spellbinders S4-110 & S4-111
     Other: Sewing Machine, Dimensional Adhesive

Wednesday, July 11, 2012

Addicted

I've been going through the Split Coast Stampers resources and finding more Delightful Packaging projects. Of course I'm going alphabetically so this one is Drawer Box. I can't go randomly through the projects, my brain won't allow it!

I started with a purple base as that is the favorite color of the recipient. It (purple paper) did not come with the June Key Ingredients kit from Taylored Expressions but it works. The patterned paper is from the kit.


I used the Delightful Day stamp set from Taylored Expressions and VersaMark ink for the flowers on the purple. Plain paper just wasn't going to work for me!

Natalie at Delightful Details also entered a project in the challenge. On her post she linked to a tutorial for the folded chevron by Julia Stainton. My only suggestion, don't make your first one 3/4" wide! Other then that, I plan on using this technique again.

The flower is the Taylored Die Petal Pop-Ups 2. Queen & Co. makes the fun Twinkle Goosebumps gem in the middle of the flower. The gems in the corners are also goosebumps.

The tag was cut using the Spellbinders Labels Four and Labels Four Small. The button and ribbon were from the kit and the sentiment I did in a Word document.

Finally, the brads on the drawer are from Making Memories. Unfortunately there is only one card in there right now. I need to get to work on more.


Monday, July 2, 2012

Hog Wild

DH moved some pigs around today. I was hoping it didn't mean we had some sows (mamas) ready to farrow (give birth). He will be out of town tomorrow on business and then all next week. I firmly believe the sows know when he is gone thus making me play mid-wife. He claims none are ready to go. I'll believe him when he gets back and there are no new babies.

As I'm thinking pigs, I made a card using My Favorite Things July sketch.


Well, I started it yesterday, but the sentiment worked today! ;) In February I ordered the VIP kit which was Country Charm. It had the PI Cowboy stamp and an additional set of sentiments which included the 'Go Hog Wild.' Perfect for someone who raises pigs, for fun. The kit also included the Country Charms Die-namics.

I used the Cosmo Cricket Wanted to put together his duds. I couldn't have asked for better paper. Cutting all those pieces was interesting. DH wondered why I didn't get to bed until 2 this morning. He doesn't understand the need to stamp, cut and glue. He (as in the cowboy, not DH) is colored with Copics, E00, E21, E50 and R21.

The fence is Die-namics Woodgrain Fence. It was white when I cut it out. However, this is an old fence thus it has Distress Ink Weathered Wood on it.

The hat banner is one of the Country Charms dies. I used Fired Brick and Walnut Stain Distress Markers on them and Distress Ink Vintage Photo around the edges. The sentiment was done with Memento Tuxedo Black. The twine is from My Mind's Eye.

Now I have to go mow the lawn. I'd rather stay in here and play. Added: I mowed the lawn and then came in and posted this. Why I didn't post before I mowed, I have no idea.